Tips for reversing a boat trailer at the boat ramp
Skillfully reversing a boat trailer requires lots of practice and patience, but it’s worth it. Here are some tips for how to reverse a boat trailer safely and expertly.
Practice makes perfect
Reversing a boat trailer doesn’t come naturally to most, so it’s important to practice until it becomes almost second nature. Drive around some quiet streets and practice reversing in an empty car park or on vacant land.
It’s all about the wheel
The boat trailer will move in the opposite direction to the steering wheel. So if you’re turning the wheel to the right, the trailer will go to the left.
Plan your move
Knowing exactly where you want to end up and having a plan for getting there is a key part of the reversing process. Be mindful of where you’re going and use the vehicle to purposefully get there.
Don’t turn sharply
When learning how to reverse a boat trailer, the last thing you want to do is jackknife (this occurs when the tow vehicle and trailer bend abruptly to form a ‘V’ shape) your trailer. Always move calmly and steadily, and give yourself plenty of time and space to make any turns while reversing.
Use your mirrors and turn your head
When reversing a boat trailer, be mindful of everything around the tow vehicle and trailer. Use your rear-view and side mirrors, but also look outside your window to keep an eye on where the trailer is headed.
Ask for guidance
If you have a passenger, ask them to get out and help guide you in the right direction. This is invaluable assistance, particularly if you’re still learning or have lots of people or objects to avoid.
Ignore your audience
Having people watch you reverse, especially when you’re still getting used to it, can be nerve-wracking. Rather than getting caught up in what they think or wondering if they’re waiting for you to mess it up, simply ignore them.
Tips for reversing a boat trailer at the boat ramp
Using a boat ramp adds another dimension to your reversing challenge, so try the following tips:
•Observe the boat ramp rules before attempting it yourself. Become familiar with the ways others do it. Speak to other drivers to find out the challenges they are facing – is the ramp extra slippery that day? Is there a specific trick they engage when using this particular ramp?
•Set yourself up for success by getting as straight as possible before beginning the act of reversing onto the ramp. After all, you don’t want to be caught on a boat ramp sideways or jackknifing.
Remember, practice makes perfect, so the best way to learn is to get out there and give it your best shot.
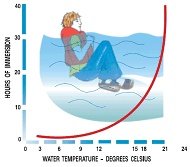
Hypothermia
The term ‘hypothermia’ means lowering deep-body or core temperature. ‘Immersion hypothermia’ is an acute type of hypothermia produced when a person is immersed in cold water.
An adult of average build could not expect to survive more than three hours of immersion in midwinter. The time is very short when you consider the time lost before a search and rescue operation is under way.
The heat escape lessening posture (HELP) combats hypothermia and can be a lifesaver to people in cold water.
The HUDDLE position can also be used if there is more than one person in the water. To reduce body heat loss, make sure you stay close (huddle together) and remain still.
WARNING: the consumption of alcohol, attempting to swim or movement in the water will cause the body to use up heat rapidly, which will hasten the onset of hypothermia.
When recovering a person from cold water, keep them lying down if at all possible to reduce the load on the heart. Treat the cold person as for hypothermia and watch carefully for breathing difficulties due to intake of water.
Key points for treating hypothermia
1.Remove the person from the cold-inducing environment
2.Protect the person from cold wind
3.Remove wet clothing if practical
4.Warm victim with dry blankets, towels or skin-to-skin contact
5.Warm the area of high heat loss, that is, head and neck, sides of chest, armpits, and groin. Do not warm, rub or massage limbs
6.Observe the person for deterioration in condition
7.Manage an unconscious person by placing them in the lateral position, making sure their airway is clear. Continue warming procedures
8.Do not give the person alcohol
9.Do not allow the person to walk around
10.Seek medical assistance.
New Emergency Radio Service
A new marine distress and emergency monitoring service has just been launched- Marine Radio Victoria.
MRV monitors and records radio traffic on VHF and HF emergency radio channels 24 hours a day/365 days a year.
MRV covers the Victorian coastline, up to 20 nautical miles from the coast on the VHF emergency channels and out to 200 miles for the HF emergency frequency. The service replaces coast radio Melbourne.
MRV also provides radio checks, and broadcasts weather forecast warning.
TSV recommends that all boaters, including paddlers and kayak fishers, on the bays and along the coast have a VHF radio to take advantage of the benefits of MRV.
Marine Radio Victoria operates on:
VHF: channels 16 and 67 for voice and 70 for Digital Selective Calling
HF: 4125kHz, 6215kHz, 8291kHz, 8176kHz, 12290kHz.
All information can be found at www.transport.vic .gov.au.
Trip Preperation
Every accident or incident is unique but all occur due to a series of events, circumstances or failures. Good preparation gives the master of a vessel the best opportunity to make good decisions while on the water.
Five things to do before every trip
1.Check your vessel is fit-for-purpose and all lights, electrics, ropes etc are well maintained
2.Ensure you are carrying the required safety equipment
3.Check the weather and tides
4.Familiarise yourself with the waterway rules
5.Let someone know before you go.
Information courtesy of the Maritime Safety Victoria website
GPS Verification Signs
Did you know that GPS verification signs have been installed as either standalone signs or incorporated into boating safety information signs at the following boat ramps and jetties:
This means that at global positioning system (GPS) verification sign locations, mariners or owners of portable GPS units can validate their position and map datum settings.
•Lakes Entrance (three locations)
•Marlo Jetty
•Cape Conran
•Sydenham Inlet
•Mallacoota (two locations)
•Hastings
•Ocean Grove
•Inverloch
•Port Welshpool
•Port Albert
•Paynesville
•Patterson River
•Queenscliff
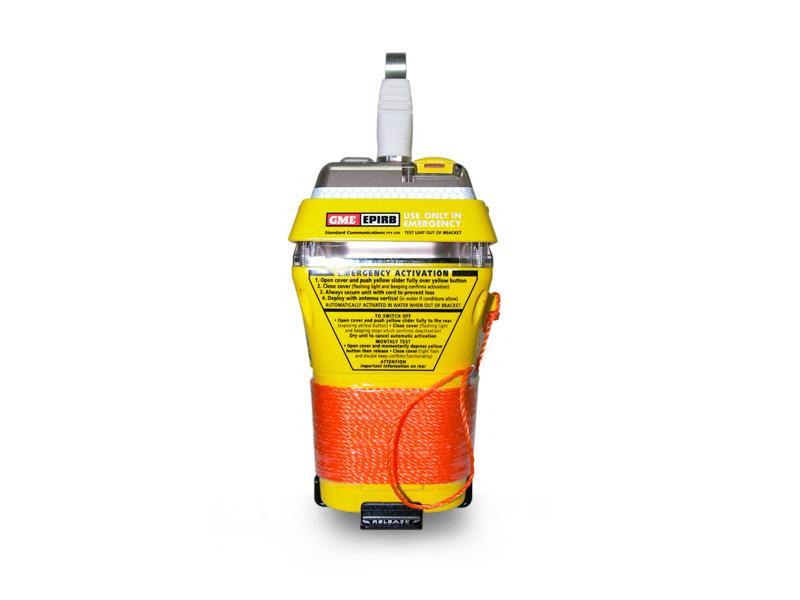
Using Distress Beacons (EPIRBS)
Once an EPIRB has been activated, leave it on until instructed by rescue authorities to switch it off.
Your EPIRB is the best reference point for rescuers whose aircraft, vessels and vehicles may not be able to remain in the same location as you throughout the emergency.
If you must abandon your vessel, attach the EPIRB to yourself, not the vessel. While EPIRBs are required by law to be carried when operating more than 2nm from the coast, we recommend operators on other waters also carry EPIRBs.
More information about distress beacons can be found on the AMSA website.
Disposal
Distress beacons must be disabled before disposal. Check the beacon manufacturer’s instructions for disablement, and contact a local waste management facility to see about disposing of your unwanted beacon in an environmentally friendly way.
(Information courtesy of ’Maritime Safety Victoria)
Anchoring
Anchoring is not only a normal part of boating, it is also an important safety measure in an emergency.
Anchoring may keep the vessel safely positioned head on to heavy conditions and it can also allow you to retain your position and not be swept away or on shore.
Five things to remember
1.Choose your anchor, chain and/or line carefully to suit your vessel requirements, the depth of water, and the bottom type you are likely to operate in
2.Always lower the anchor rather than hurling the anchor and chain overboard, this may lead to tangling.
3.As a rule of thumb, the line paid out should be at least three times the depth of water. This distance should be increased to five to one in rougher seas
4.Regularly check the anchor is not dragging by inspecting the rope tension and monitoring your position
5.Never drop anchor from the stern or midship, you may risk swamping the vessel.
The anchor with chain or line or both chain and line must be of sufficient strength and durability to secure the vessel and must be appropriate for that purpose in the area of operation of the vessel. The chain or line or combination must be securely attached to both the anchor and the vessel at all times.
The Vessel Operating and Zoning Rules (VOZR) state that anchorage of vessels is not permitted in certain areas.
•It is illegal and dangerous to anchor in shipping channels or transit lanes
•It is illegal and dangerous to tie up vessels to navigational aids.
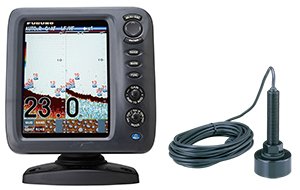
How does a fish finder work
A fish finder helps detect a fish school and provides various underwater information, such as water depth, distribution of fish school, and the condition of the seabed by transmitting ultrasonic waves into the sea and receiving its reflection. Part of sonic or ultrasonic waves, which have been transmitted, reflect back to the source when they hit an object (e.g. fish school or seabed). A fish finder uses this ultrasonic reflection characteristic.
The ultrasonic waves from the fish finder are transmitted directly underneath the boat. If they hit a fish school, very weak reflections will come back to where the ultrasonic waves were originally transmitted. The reflection received is converted into an electrical signal and subsequently sent to the receiving circuit of the fish finder. The receiving circuit amplifies the weak signals, and the processor unit processes them to generate images to be displayed on the screen. As the result, the image will be displayed on the color LCD. Stronger reflections are shown in orange or red, and weaker ones are shown in green or blue on the screen. A fish school of high density or rocks on the seabed return stronger signals, so they will be shown in a reddish color, while a fish school of low density or small fish will be shown in a bluish color. The color presentation can clearly illustrate the undersea condition.
A fish finder consists of two parts: main unit (with a screen) and transducer. The main unit should be located where it can be easily accessed in the cabin or wheelhouse, etc. The transducer should be mounted on the boat’s bottom either through hull or in-hull installation. Please bear in mind that the performance of a fish finder depends largely on whether the transducer is properly mounted on the boat’s bottom. An improperly mounted transducer may result in failure in capturing reflected waves or other serious defects. To avoid these troubles, you should consult with a technical dealer on how to properly install the transducer prior to actual installation.
Boat Ramp & Beach Cameras
Would you like to check how busy a certain boat ramp is or what the weather conditions and surrounding views are like on the day you are heading out on the water, then we have found two websites where you can access these images and webcam footage.
1. Travel Victoria- www.travelvictoria.com.au
Link to TravelVictoria
2. VR Fish- www.vrfish.com.au
Link to VRFish
Safety Equipment
In addition to wearing an approved lifejacket, operators of powered craft must also carry at least the minimum safety equipment for the waterway and conditions they are operating in.
Carrying the right safety equipment and knowing how to use it is essential. You must not operate a recreational vessel unless all safety equipment required to be carried on board is easy to reach and well maintained and serviced.
Everyone on board must know what safety equipment is carried, where it is stored and how it works. Carrying safety equipment is no substitute for proper preparation. Always conduct a check of your safety equipment when planning a trip.
Below lists the minimum safety equipment requirements for powered vessels operating on Victorian waters.
The equipment you need varies according to:
•The type of vessel you are operating
•The type of waterway you are on
•Your proximity to the shore.
- Life Jacket
- Approved fire extinguisher
- Waterproof buoyant torch
- Anchor with chain or line or both
- Bailer
- Bucket with lanyard
- Electric or manual bilge
- Pair of oars with rowlocks or pair of paddles
- Orange smoke signals
- Life Buoy
- Dinghy or liferaft
- Compass
- Marine radio
- Red star parachute distress rocket
- 406MHZ Epirb
The above information is courtesy of the Maritime Safety Victoria website. The information can be found on the below link.
Link to Maritime Safety Victoria


